Rendering as illusion
How rendering works, and how artists make 3D images look drawn or painted.
Stylized rendering / Part 1 / Michael Rowe Jones
I think of the 3D artist as a kind of trickster. Much of the work goes into making the viewer forget that the image was built in 3D.
In visual effects, a rendered object might need to belong in photographed footage. A reflection or shadow can support the illusion or give it away. Physically based rendering helps by modeling the interaction of light and matter. Pharr, Jakob, and Humphreys explain that goal in Physically Based Rendering.
I want to make 3D images that look drawn or painted. That can mean breaking up a straight outline with brush marks, holding a pose, or stretching an arm into a smear that makes a fast movement easier to follow.
The viewer may still recognize the image as CG. I am interested in removing the things that work against the intended style, such as uniformly smooth movement or perfectly straight model edges.
How a renderer produces an image
A renderer produces an image from geometry, materials, lights, and a camera. Geometry describes shapes. Materials describe how their surfaces respond to light, and the camera determines the view. PBRT's introduction explains these inputs.
Rasterization projects geometry into the image. For a triangle, it determines which image samples the triangle covers and produces fragments at those positions. A fragment is a possible contribution to a pixel. Depth testing can discard it if another surface is in front; blending can combine it with an existing color. Khronos documents the rasterization stage.
Ray tracing finds where a ray intersects a surface. Rays from the camera can locate visible surfaces; other rays can test whether a light is blocked or follow a reflection. Path tracing samples paths of light through the scene to estimate the color reaching the camera. PBRT's ray-tracing chapter explains these calculations.
These methods do not dictate an art style. A path-traced character can have impossible proportions, and a rasterized image can aim for realism. Artists can change the result at several stages:
- 01 / Scene
Shape and timing
Change a silhouette, flatten a figure, or hold an animation pose.
- 02 / Render
Projection and shading
Choose the view and how surfaces turn light into color.
- 03 / Image
Compositing
Combine layers, simplify detail, or displace sample positions.
- 04 / Display
Output
Convert the working image for the screen it will appear on.
Changing a pose requires animation work. Breaking up its rendered outline may only require an image filter. The distinction helps when choosing what to change in a scene like the one below.
Compare projection, shading, and animation
Load the sculpture study and leave it paused. Compare the two cream beads before changing the projection. They have the same radius, but one sits closer to the camera.
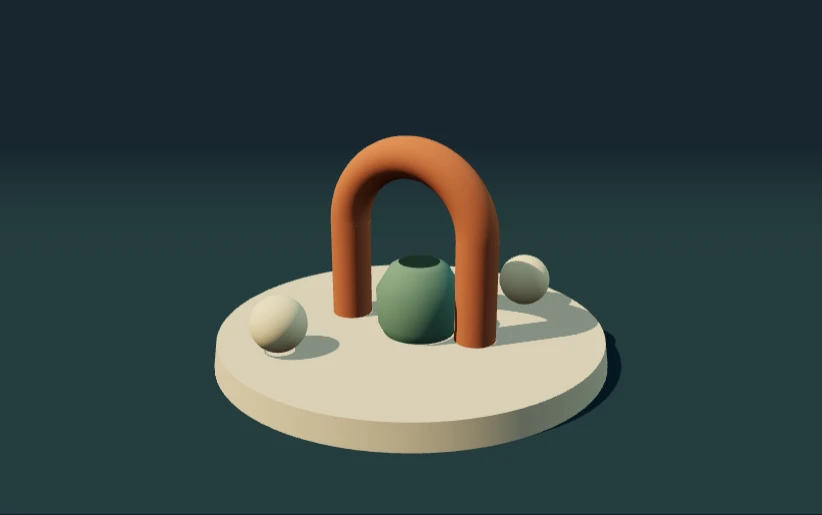
Change the camera, shading, and pose timing on one small sculpture.
Switch to Orthographic. The camera keeps its position, but distance no longer changes an object's projected size. Both beads now appear the same size. This changes the projection for the entire scene; flattening one character inside a perspective scene is a separate technique.
Next, compare Smooth light with Toon bands. Watch the curved arch. The geometry and lights stay in place while the material groups the shading into bands. The bands replace the smooth light-to-dark gradient and make the curve appear flatter.
Press Play rotation and compare Continuous with On twos. Both use the same rotation, but On twos shows a new pose twelve times per second. Each pose lasts two frames on a 24 fps clock. The internal clock keeps advancing between those poses, and the camera stays fixed. Pause and use Starting angle to inspect a particular view.
After comparing the settings separately, try them together. Watch whether the arch still looks curved and whether you can follow its rotation.
Maxime Heckel's interactive rendering essays inspired the format of this series. His painterly shader article lets readers compare individual operations before combining them. The geometry and code in this sculpture study were made for this article.
Animation and shading in stylized films
Animation software can calculate the poses between keyframes, and a renderer can simulate shadows and motion blur. In stylized films, artists often replace some of those calculations with effects designed for a particular shot.
For Into the Spider-Verse, Sony Pictures Imageworks describes held poses, print-inspired shading, and graphic alternatives to conventional blur. Smear geometry and extra limbs helped show fast movement. Artists built the illustrated appearance into the animation and models as well as the final image processing. Imageworks' production breakdown shows examples.
In Puss in Boots: The Last Wish, VFX supervisor Mark Edwards describes stepped action, adjusted rim lights, and tools that broke up model outlines with rendered points. The team built these controls into its 3D workflow so artists could adjust them. His SIGGRAPH interview explains the production approach.
Those films are references for my own work, though attempts to make 3D look drawn go back much further. Winkenbach and Salesin published computer-generated pen-and-ink illustration in 1994. Disney's 2012 Paperman paper describes artists drawing lines over CG animation, then using the scene's motion to carry those lines between frames.
Interpolation can help produce this look too. Disney's Meander drawing tool uses computer-assisted inbetweening. Artists make drawings, and the software helps generate the drawings between them. Keeping some automated steps can leave more time for the poses and lines an artist wants to draw by hand.
Testing the effect on this site's workbench
The desk on this site's homepage has several useful test objects. The broad desktop can tolerate more smoothing than the lamp's thin supports, and the text on the monitor needs to remain legible.
The brush study in the next article changes the image after rendering. This is called post-processing. A shader reads the rendered image from a texture and writes a new image. Three.js can run several of these operations before displaying the result. Its post-processing guide explains how to set them up.
A paper texture can make the color uneven while leaving an outline untouched. Brush displacement changes where the shader samples the scene's color, which can also change the outline. These operations work on the image. They cannot reveal the hidden side of an object because that information is absent from the render.
Camera movement introduces another problem. A texture fixed to the screen does not follow the objects. Marks attached to a surface do follow it, but they change apparent size and angle as the surface moves. Bénard and colleagues' work on coherent stylization studies how to keep marks consistent during movement.
I am also working on these problems in GraveShift, my solo game. Its DrawnMotion setup adapts and extends the licensed OverAnim foundation. It provides controls for held poses, character flattening, smears, and multiples. Those tools change the animation and geometry before rendering. The brush filter changes the resulting image.
In the next article, you can adjust the brush filter on a fixed image of the workbench and compare the results.